Sunday, June 24, 2012

DIY Tank Sleeve Button Up

As you know I am a big fan of button ups but during the summer they can get a little hot, so solution?
Tank sleeve button ups!

I went to Goodwill the other day and found a button up with such a beautiful print on it. But the selves made it look to western for my taste so, here is my tutorial on how to cut off the sleeves cleanly, you know, so it looks like you bought it that way.

Step 1. Find a shirt.


2. Pick apart the seem at each sleeve. A small pair of scissors works perfectly, be careful not to rip the fabric. 


3. For good measure I suggest you run the very edge of the sleeve through the sewing machine or hand stitch it, to prevent fraying. 

4. You're done! And now you have a brand new summer shirt!


Tomorrow I will post pictures of my outfit pairings with this shirt, and if you end up doing this DIY please comment and post pictures, I would love to see how yours turns out!


Monday, June 18, 2012

Of Monsters and Men

Now, reviewing music is not what this about. Not because music isn't beautiful and magnificent but because when I was looking at other blogs for inspiration and advice I noticed that a lot of blogs cover everything under the sun. I didn't like that. It was too confusing and made it hard to determine what was important and what wasn't. So, I decided that if my blog was going to be anything it was going to be simple.

But this band, Of Monsters and Men, there music is beautiful. It's poetic and romantic and each song sounds like a fairy tale. Go listen to them. They are the type of band that makes you just want to lay in a field and do nothing but feel the wind blow past you.

To make this relatable to my blog I looked to their music video, Little Talks for inspiration. (A beautiful, artistic video.) So here is my tutorial on how to get the Little Talks look.


Make Up

Upper Lids - Tenacious Teal Color Tattoo


Lower Lids - In Brown Lasting Drama

Lips - In Warm Latte Colorsensational


Now, to top off the outfit find some feather accessories and get creative about how you wear them, and while you're figuring that out listen to Of Monsters and Men. 


Sunday, June 17, 2012

DIY Repainted Heels

So, I have this pair of plain white heels and I have grown bored with them and what better way to stop being bored with them than to paint them.

Step 1. Find a white pair of heels or shoes.

Step 2. Apply painters tape.

Step 3. Pick out two colors.
(For paint either use fabric paint, found at  Michaels or acrylic paint, brand called basics, also found at Michaels.)


Step 4. Paint. Starting with your first color.
(I chose beige (color 1) and red (color 2))


Step 5. Wait 15 minutes and then remove the painters tape. You want to be sure that your paint isn't runny so when you remove the tape the lines stay nice and crisp.


Step 6. WAIT AT LEAST 30 MINUTES! You may think that the paint is dry but wait anyway. the next step involves placing tape on top of were you have already painted and if it is not completely dry the tap will peal the paint off the surface and you will have a mess on your hands.

Step 7. Begin painting with color 2.


Step 8. Once you have finished with color two remove all the tape and go back around the shoe and correct any smudges or spots you might have missed.

Step 9. Repeat on the other shoe.

Step 10. Marvel at your new pair of shoes and find an amazing new outfit to pair them with!


Saturday, June 16, 2012

Lace for a Summer Day

Yesterday I ventured to my local Goodwill to stalk up on some basic pieces for some DIY posts I am planning when I found the most beautiful vintage lace shirt. It is gorgeous and the perfect summer piece.


This light lavender drop-waist dress is a piece I have had and loved for a few years now from Urban Outfitters paired with my new Goodwill lace top. I paired this outfit with the yellow flats to contrast with the pale colors of the rest of the outfit and to add a pleasing pop. And how can you have any summer outfit without a pair of sunglasses? Well this cat-eye pair works perfectly with the vintage looking outfit. 

Wednesday, June 13, 2012

Closet Staples - White Button Up

Closet staples. Those basic pieces that everyone has in their closet. But even though everyone has them, people are unique and have the beautiful ability to make them look completely different.

The white button up is wonderful because it is light enough for the summer, able to be layered during the winter, comfortable enough to just hang out with friends, and professional enough to be worn to work or a job interview.

Here are just two of my favorite summer pairings with my white button up. 


This is my white button up paired with a patterned Forever 21 which sits on my hips with the shirt tucked in. The necklace is this wonderful thick gold chained necklace with a bunch on different types of peppers and coins hanging down from the bottom. I love this necklace, its a little odd but, honestly, that is why I love it. I always roll the sleeves up during the summer to help fight the heat but also because I just love the way it looks! Recognize the shoes? The tan suede ones again. I love them the are perfect for the summer and also perfect for me because they don't have the biggest heel and for someone who isn't great at walking in heels these are absolutely perfect. 


A white button up paired with navy blue high waisted shorts? Honestly what could be prettier? And falling in with Rosie the Riveter lets also add a bandana to the mix. The clutch is actually a piece that I made and I will be doing a post on it later this week (recognize the fabric? ) And finally paired with a cute pair of ankle boots with a small heel. Heels seem to be turning into another part of my summer staples. I'm not great at walking in them so what better time to practice than over the summer?

So, in conclusion, add a white button up to your closet you won't be disappointed. 


Tuesday, June 12, 2012

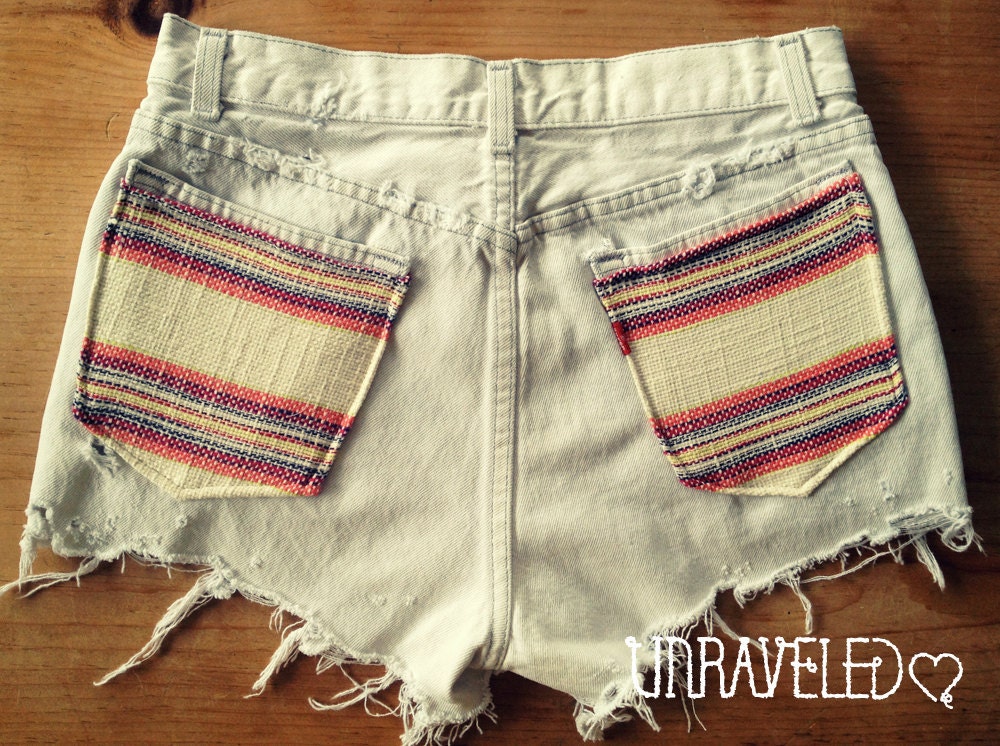
DIY Short Pockects

I got the idea for this tutorial while I was scrolling through Wanelo looking at all the pairs of shorts I couldn't afford. Like these (So cute!) ,

Unraveled -$80.00

Hooked yet? I am. And if I wasn't a poor college student I would buy these in a heartbeat but I am and I have resorted to making my own. 

Step 1. Goodwill**
Go to your local goodwill. If you like the cut off look I would suggest buying a pair of jeans and cutting them off yourself (this is what I will be doing so if you are not sure how to cut them correctly I'll show you). But, if you are just interested in decorating the pockets you can just buy normal shorts. 
This is the pair I found at Goodwill,

L.E.I. - $5.00


**This place is amazing you can find SUCH good pieces for so little! So go down to your local Goodwill and look around. A suggestion to keep in mind, don't go in there looking for anything to specific because odds are you won't find it and you will spend all your time looking for it and miss something great. So go there, find great pieces, and keep an open mind. 


Step 2. Finding a Good Fabric
Again, look around at goodwill and keep an open mind, you will know the right pattern when you see it. If you can't find what your are looking for at Goodwill, Hobby Lobby has an excellent fabric selection! And they always have a discount coupon or a sale so before you go check their website for coupons.
Here is the fabric I found at Goodwill,

$2.00
Step 3. Cutting your shorts.
The best way to get the length you want is to get a pair of your favorite shorts and use them as your measuring tool. 


You can do this by matching up the inseam of your jeans to your shorts. 

Then, with a rulers assistance, use a piece of chalk or a pencil to mark where you want your shorts to end. 


Next, take a good sharp pair of scissors and cut along the lines you have drawn, making them as straight and even as possible. 


Don't worry about the chalk lines, they will wash off easily. 

Step 4. Pinning the fabric.
Getting the fabric to the exact size is very important. 


Step 5.
Just outline the edges with the sewing machine and repeat on the other side and you are finished!


Monday, June 11, 2012

How to Dress for Job Hunting


Summer jobs. We all want them, I'm sorry, I mean need them and sometimes figuring out what to wear for them can be tricky. 

Above is my staple outfit for the hot summer job hunting days. The shorts are from Zara and have a professional quality about them while still telling employers that, yeah I have a style and I love to show it off but I can still be professional and respectful. 

The vest is just a simple cotton sweater vest (hand-me down from my mom), cut appropriately while still being short sleeved to help fight that summer heat. 

The necklace is just a simple $5.00 fake pearl necklace from Forever 21. What I like best about this necklace is it also looks good wrapped around as a bracelet, again adding a classic yet professional quality to your look.

The Urban Outfitter shoes are my favorite, their simple tan color goes with everything and the little suede bow adds a little extra fun without overpowering anything. I would highly suggest adding a pair of tan suede shows to your closet, they are honestly that useful.

The bag is just a simple bag. For this I went with functionality over fashion forward. This bag helps because it is big enough to carry a folder that holds all my resumes so I don't have to  fold them and when I present my resume to potential employers they are neat and crisp.


Saturday, June 9, 2012

DIY Hair Clips

While in Anthropologie drooling over all the cute clothes that I can only dream of affording I stumbled upon these beautiful hair clips.


I fell in love. And as I looked at it a thought popped into my mind. Hey. I bet I could make this. 

Step 1. Choosing Your Shape. 
I like the flower idea so after a bit of googling and tweaking on paint I found myself the perfect template. 


If this isn't the template you want to use they are easy to find, just type in flower (or any other shape) template into google.

Step 2.  Fabric.
Find a good fabric, the thicker the better.  


($2.50 at Goodwill)

Step 3. Trace the template onto your piece of fabric.


And then cut your flower out.


Make sure to leave a little bit on the top. 


To make things easier use the little piece you left on the top to clip onto something like a clipboard or a book.

(Read Around the World in Eighty Days by the way)

Step 3. Decorate the Fabric.
Pick out some pretty beads and decide if you want enough to cover every inch of the fabric or leave some exposed. I plan on covering every inch. 
(You can buy beads at Michael's or online at Fusionbeads)

Now, you can use simple sewing thread to sew the beads onto the fabric but I would suggest (and what I will be using) is FireLine size 0.006 which can be bought at Michael's. 

Thread a needle and make sure the needle is small enough to fit through your smallest beads.

There are lots of ways to go about doing this so if you have figured out a way that works for you use it, but if you haven't I would suggest starting in the center and working your way out and around. 


The best way to do the petals is to outline them and then work inward. 


Step 4. Cutting off the extra fabric.

When you have finished beading the entire flower you can cut off the excess fabric at the top. 


Step 5. Clean up your hair clip. 

Looking at the back isn't very pretty so lets cover it up. Grab another piece of fabric, the same one you used before or a new one. This step it very important because not only does it cover the ugly back but it protects the thread from getting snagged and ripping which, if that happens, could destroy all of your work. 


Add a few dabs of super glue on the places were the thread begins for extra protection. 

Then thread your needle, this time with sewing thread and sew together the new piece of fabric with your beaded flower. Only make one stitch to start out with. 


Then cut out the new piece of fabric a little bigger than the beaded flower. (The single stitch holds the two pieces of fabric together so they don't slip and slide everywhere when you are cutting.)


Step 5. Sewing together.


Now begin hand sewing the two pieces together. 


When you're finished snip the ends and add a dab of glue to the knot.
(I used green thread for clarity but I would suggest using a color that blends in better with the fabric you choose.)

Step 6. Adding the clip.

Pick a clip that is the length of the template you used. Don't use a bobby pin! They aren't strong enough to hold the beads! Make sure that the clip is all metal and doesn't have anything already attached because the super glue won't stick to it. 


Apply a generous amount of glue to the clip. 


And stick the clip carefully on the fabric applying pressure for about a minute. 


Admire you work for a moment and then clip it into your hair! 


I hope you found this helpful!
Comment if you have any questions about the steps.